Before printing your thesis, you should be checking several aspects. This is especially important if you print out of house in one of the copy centres in town.
This is the Before Printing Checklist.
Because, if you don’t, chances are your thesis will look very differently when printed as compared to what you see now on your screen.
Microsoft Office / Word usually sell with US settings (inches, dates). People usually reset that to European settings.
But they often omit the Paper size. Look how they compare:
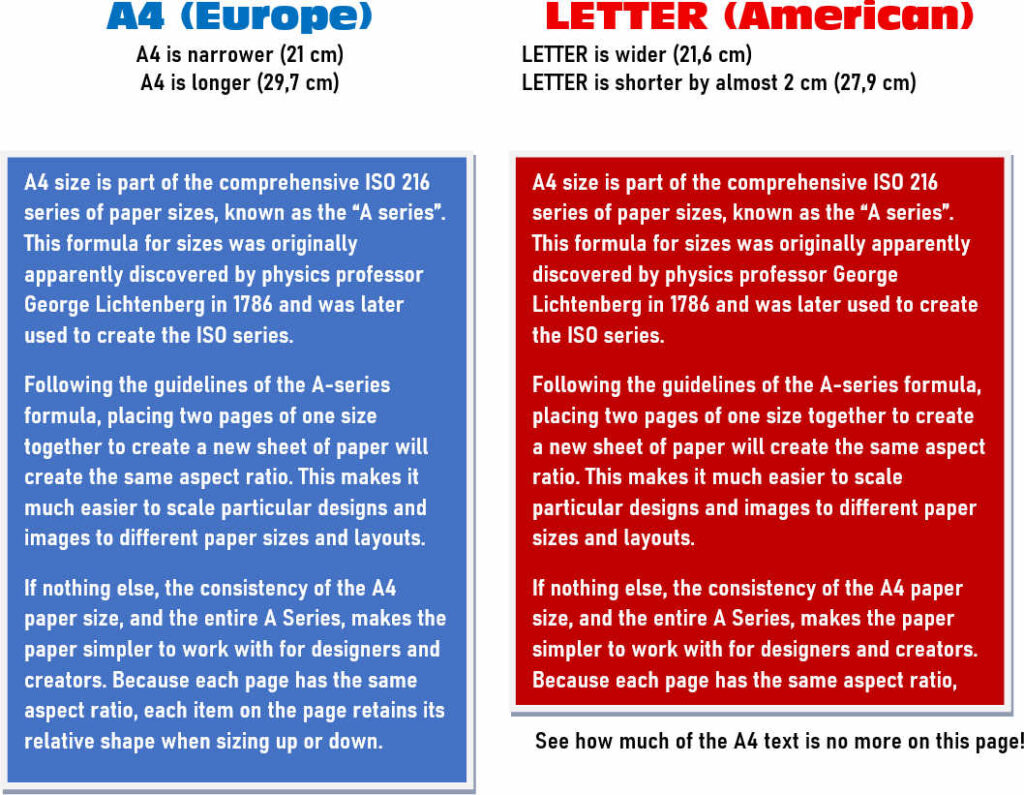
Because of these differences, your text will flow differently. A 50-page thesis set on Letter format will become a 45-page when printed on A4. But what is worse, your titles might end up at the bottom of pages, widowed of their content.
Also your paper margins will be affected. And your tables. And the positioning of images.
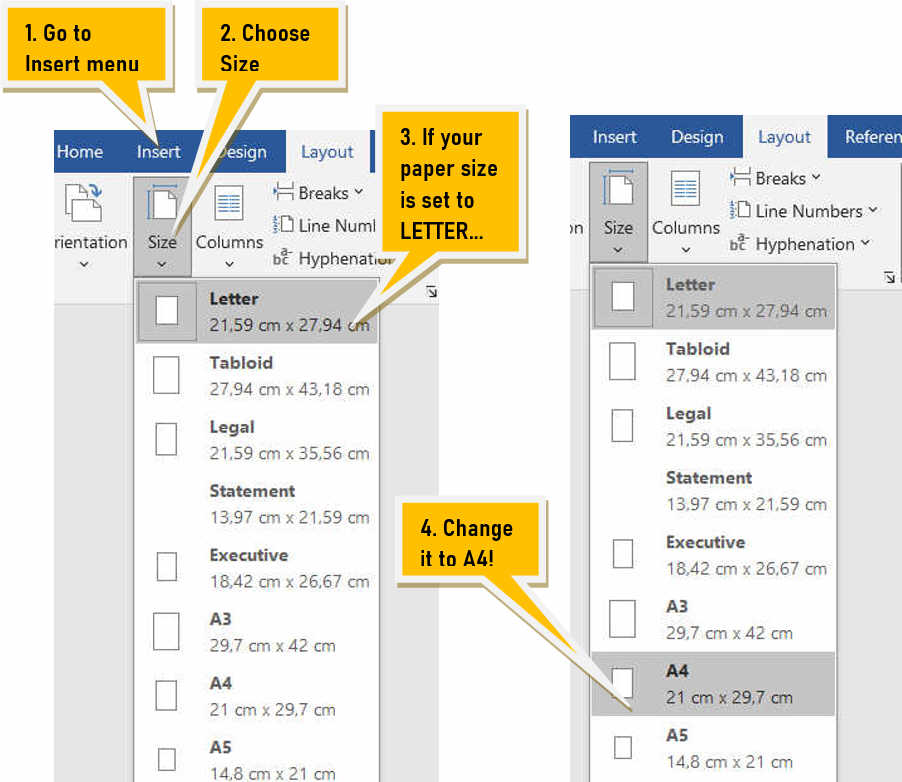
Here’s how to check your paper size, and how to correct it, if it’s wrong:
If you print in a Copy Centre or on someone else’s printer, there is a chance that that person’s computer should be set inadvertently on Print > Paper size: Letter. And it will automatically change the paper size from A4 to Letter! Without asking you!
To prevent this change from happening, you should inscribe in your document a command to inhibit it.
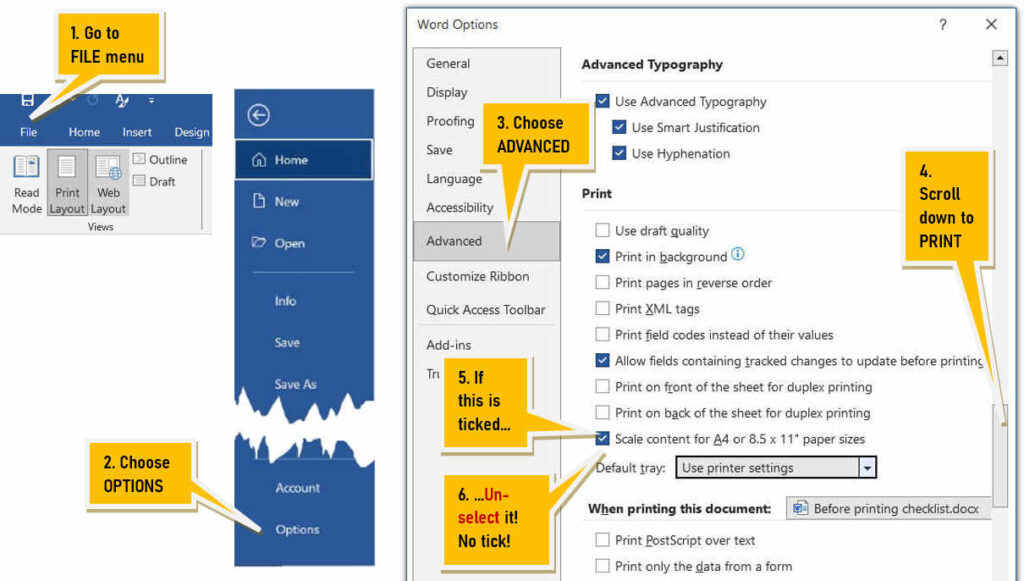
This makes sure that A4 size on your computer will remain A4 on the other computer running the printer!
If you used some fancy fonts (Gothic, Old style, SF…) for your titles or for your cover page, you should make sure they stay the same when you print your thesis elsewhere.
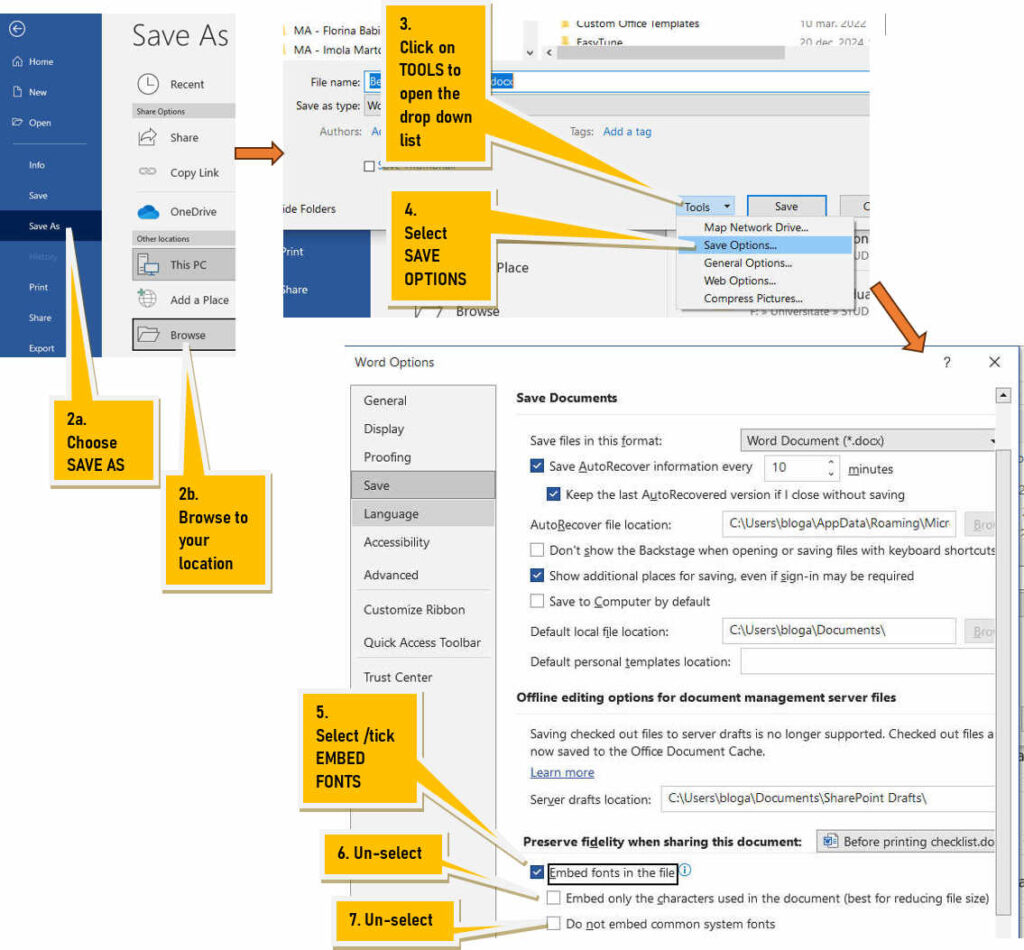
This will save the fonts inside your Word document (and the file will become larger…)
Normally if you worked directly from my Template, you don’t need to do this, as the template is set to automatically embed the fonts.
Even if you did that before, do it again now: check how the document flows. Check:
A. Do the images and their captions (legendă) stay on the same page? If not, resize the image or reduce the line height of the caption.
B. Does every table sit on a single page? If not, go to the table, right click on it, choose, Table format, go to Rows and un-check (un-select) Allow row to break across pages.
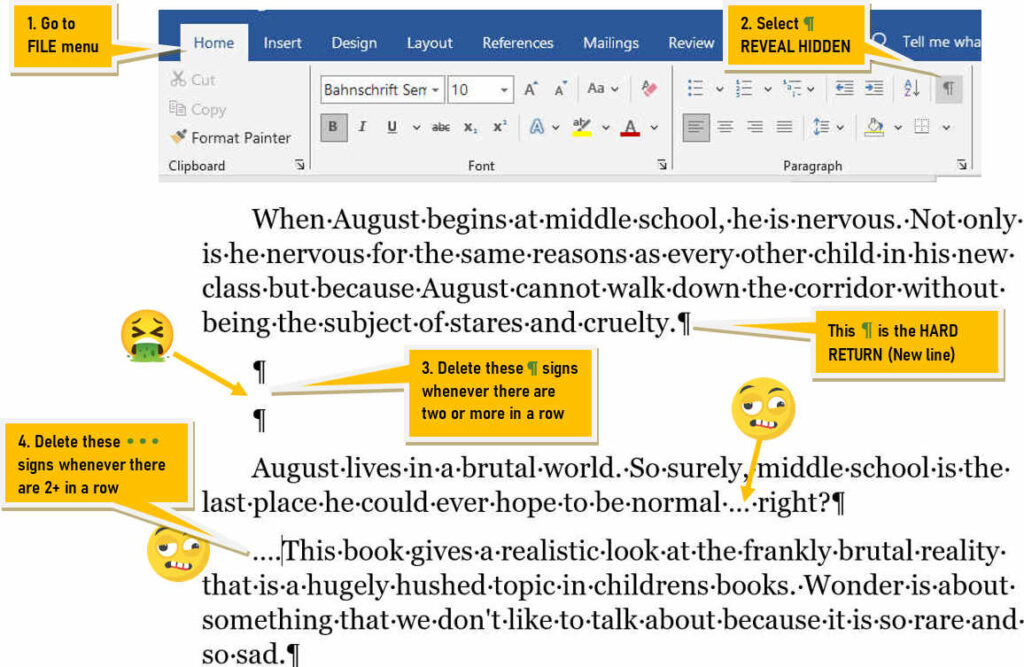
C. Do you have large empty spaces between paragraphs? If so, this is because you ”pumped” some empty lines (Enter Enter Enter…). Go to the end of the line and DELETE (Delete not Backspace!). You may visualize the hidden signs marking the End-of-line, by doing this ↓, and then you will see better what to delete:
While inspecting you might come across ”widow titles”, lonely at the bottom of pages, looking like this:
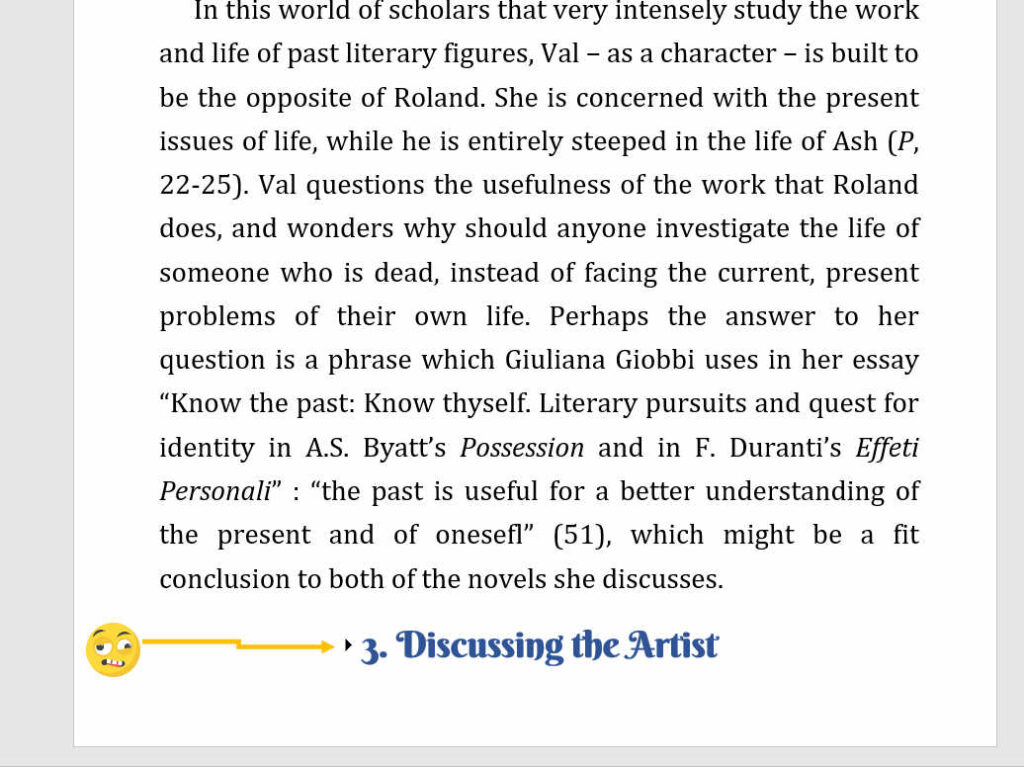
Look how ugly that title is, lying alone at the bottom of the page!
Now, in my Template, all titles have an active option; Keep With Next, which makes sure the Title always sticks together with at least the first two lines of the next paragraph.
But mind this: Word ensures that the title sticks together with any paragraph that follows. If that paragraph is just an empty line you have added, it will stick with that alone. But not with the real paragraph that follows.
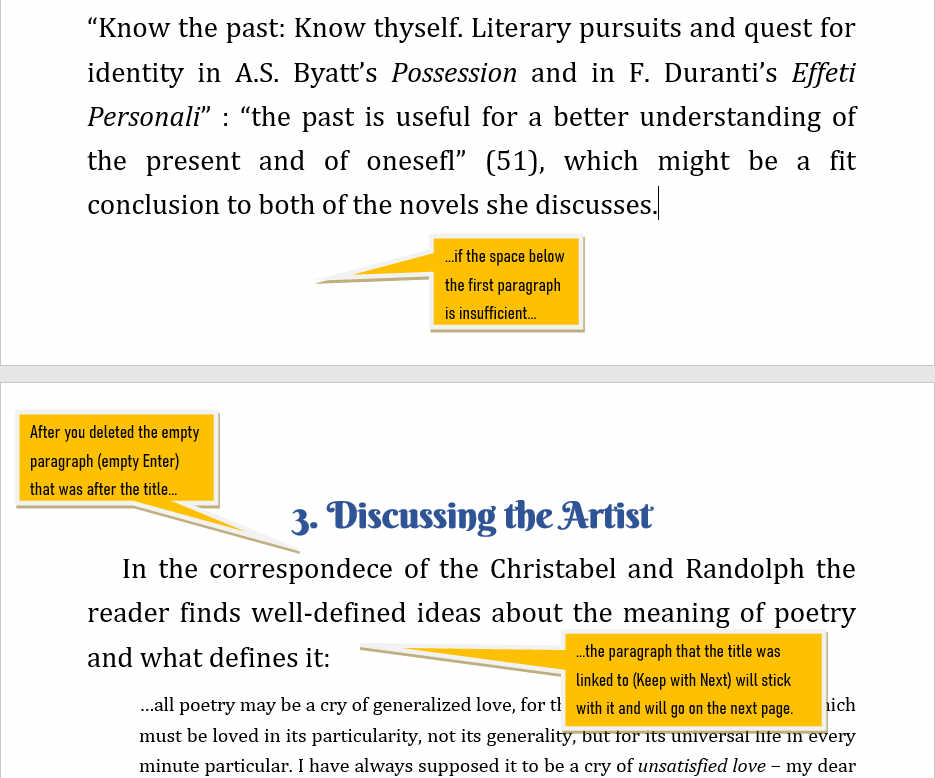
So what you have to do is to delete the empty paragraph (empty Enter) that exists after the Title. Place your cursor at the end of the title and hit DELETE (not Backspace, Delete!) once. If there is room enough at the bottom you will have this:
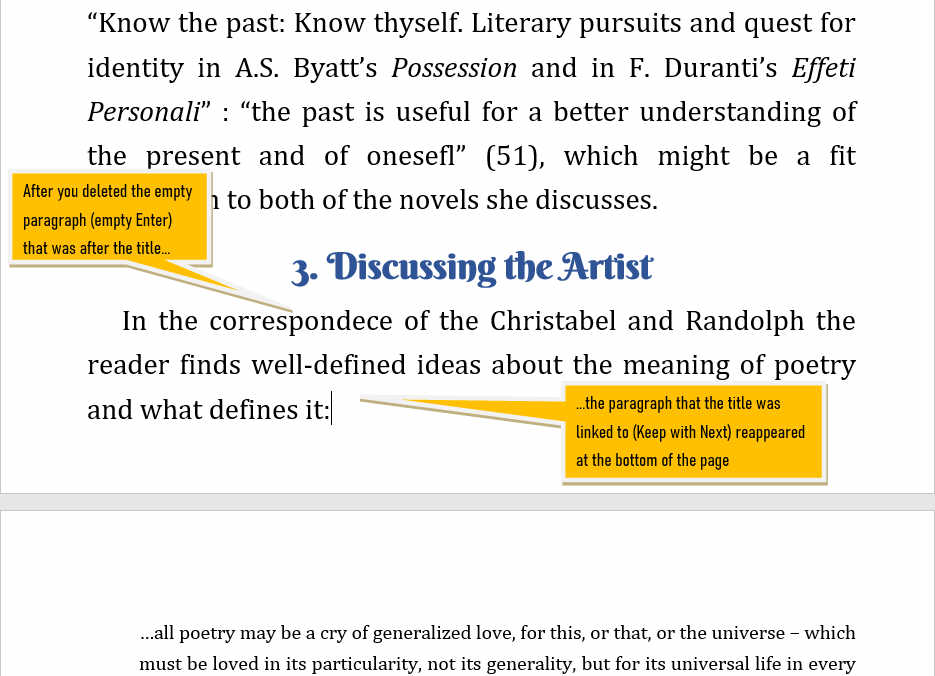
Or, if the space below that paragraph is too small, then the title + its paragraph will go to the next page:
Set your view to 2-pages or 4-pages, and scroll down throughout your thesis, checking for any remaining empty pages.
These usually result from overzealous students pumping Enter Enter Enter to force a new page and then, when the text was edited, those empty lines have moved on, creating empty pages.
Place your cursor at the end of the first such empty line, hit Delete (not Backspace), and repeat as many times as needed, until that empty page is gone!
Check if all of your titles dispay correctly in the Table of contents.
If some titles are missing. Cause: ► You forgot to apply the Titlu1 or Titlu2 style to those titles. Fix: Go the the title and apply the style (Alt-1 or Alt-2)
If you found errors in some titles ► Cause: You made an error in the title itself. Fix: Edit the title. Never try to edit anything in the Table of contents. (Explain: Those titles you see in the RoC are just fields, that copy / echo the text in the rel title. Any editing here will be lost when sasve or print!)
The numbers of the titles are wrong ► Cause: You added them by hand. The Titlu2 and Titlu3 styles have their own embedded codes for automatic numbering. Trying to write your own numbers manually just messes things up. Fix: Erase your number in the title (not in the ToC).
The running header (wrongly called by some antet, which is actually a non-running top-of-first-page thingy) is probably the last place you might wish to check. And one in which errors creeps quite easily.
(a) Does your running header reflect your actual title?
Cause 1: Sometimes, you might have forgotten there the header that the template came with. Fix: Insert your title.
Cause 2: Or you might have changed the title of your thesis in the meanwhile. Fix: Just edit the header to reflect your current title.
Note: To edit the Header you must double click your mouse in the area above the page. And double click on the page when you wish to exit.
(2) Is your header longer than one line?
Cause: You copied there the long title of your thesis, and it spilled into the next line. This is an absolute no go. Headers never have more than 1 line. Fix: Shorten the text in the header, maybe by skipping the subtitle, maybe by dropping articles, maybe by just keeping the essential words.
Before going to the Copy Center, do the follwoing:
- write down the total number of pages you have (you will check this against what the printer operator will tell you)
- using your phone, take a photo of the Title page, with all its graphics and special fonts, and of the last page of your thesis (before the Reference list); again you will check this with the printer’s results.
Because Word documents (doc and docx) are notoriously ”elastic” and might change when moved upon another computer, we use PDF as a stable format to transfer these files.
How to: Just go to File ► Save as ► and then choose the PDF format.
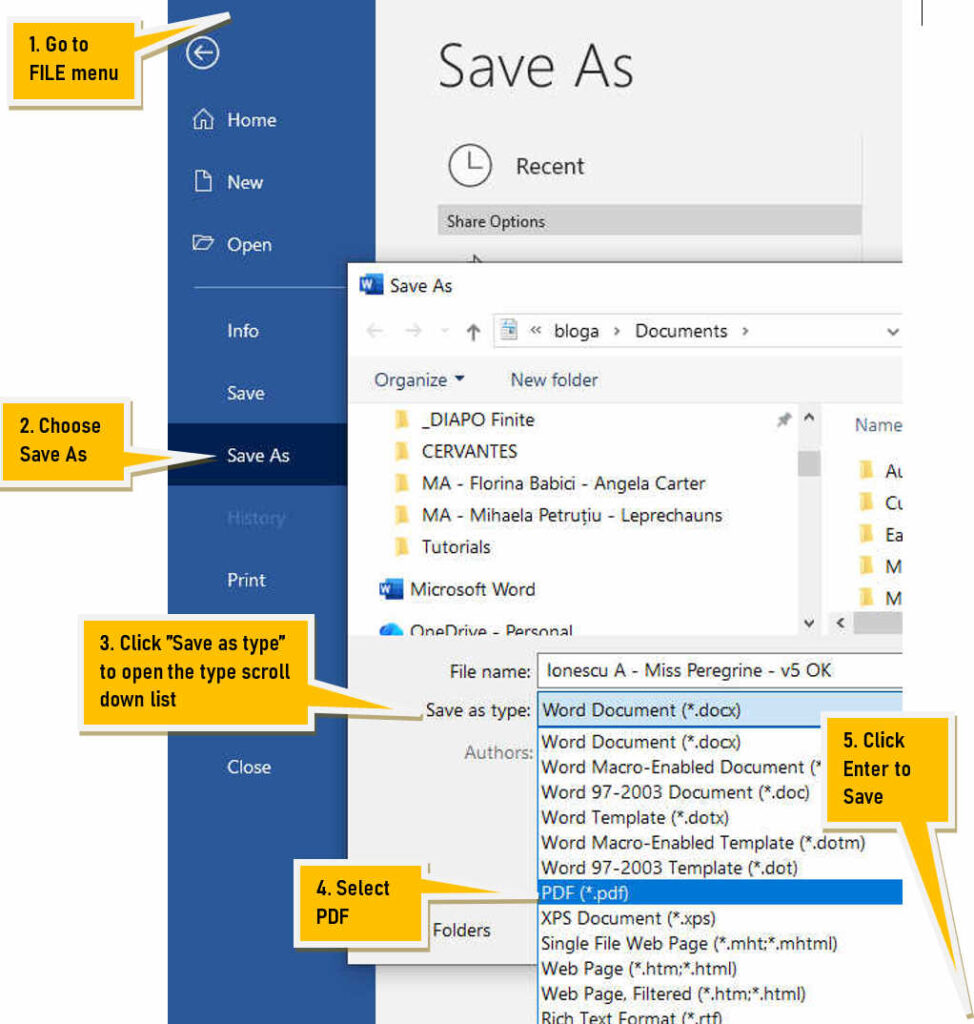
Saving your thesis in PDF could also bring some unpleasant surprises. These are commonly related to your use of fonts that are not supported in PDF conversion.
Open your original word document on your screen in the left side on your screen (click on the document’s title bar, and then hit the Windows Key and Left arrow simultaneously,  ←). Then open the PDF file on the right side of your screen ( →). Now you have both files visible in parallel. Check the following.
a. Your Title Page.
If you used some fancy fonts for your cover, these might have failed to convert in the PDF file. Check the style of the fonts not the text itself!
Fix: The quick fix I recommend is the following: in your Word document, make a screen caption of the Title. Save that image. And then introduce it in Word. Ignore the mess that the image created on your title page. Right click on the image, choose Wrap Text, and select In front of text. This will bring the image on top of text. Then move it around until it sits exactly on the original text. Avoid resizing or distorting the image.
b. Your name and the supervisor’s name.
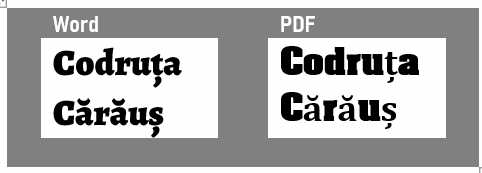
Check if the diacriticals (ă, ș and ț) are written in exactly the same font type. Check the weight of the font, its width. Compare the ă with any a in the names, the ș with s, the ț with t. The body of these letters should match perfectly!
Fix: If you notice a difference, just replace the font in the names with any similar-looking font.
c. The header.
Check if the header is in the same font (if condensed font originally, it should be the same). Verify if the header still consists of a single line of text (headers should never have 2 lines!).
Fix: Just shorten the text in the header. If your title has a title: subtitle format, keep just the title. If it’s a longer title, keep just a portion of it (up to 5-6 words) that is the most meaningful.
d. The internet addresses.
In the List of References, we used the Web_in_biblio style for web addresses. This is a font style that uses a very narrow font. Sometimes this font fails to convert in PDF, where it defaults to a regular non-compressed font.
Fix: You should replace the font (if possibly directly in the style) with a more secure font, like Arial Narrow.
Now that you’ve cleaned your thesis, let’s see Checklist At the Copy Center!
If you are still struggling with the supervisor’s corrections, check out my FAQ: Tracking Changes.